



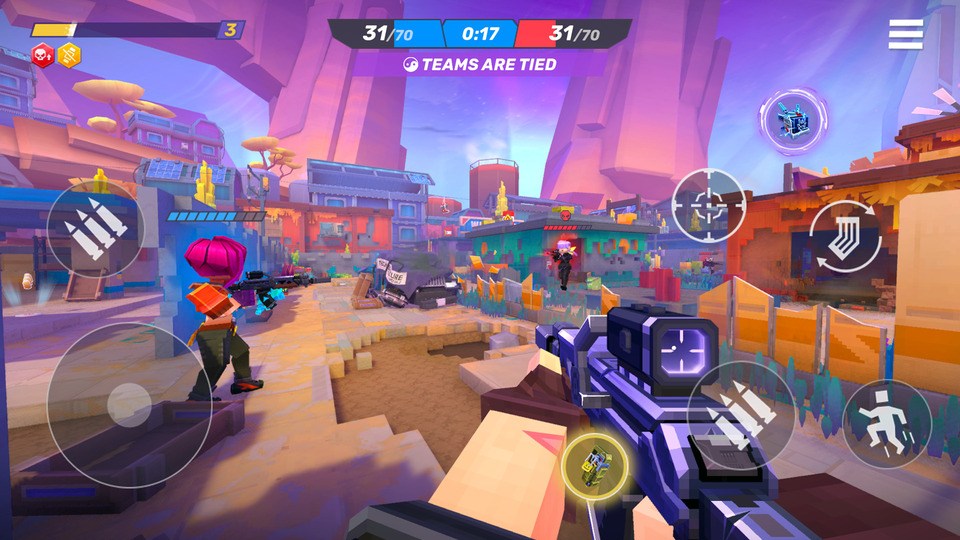
Pixel Gun 2 is built around fast 5v5 FPS combat, destructible environments, rapid weapon switching, and constant movement. On a touchscreen, that combination puts considerably more pressure on your control layout than a traditional shooter with a physical mouse and keyboard.

The default controls can work while you are learning the game, but a customized HUD, camera sensitivity, field of view, and button arrangement can make aiming and movement much more comfortable. Here, we will provide a strong starting setup for Android players, followed by three HUD layouts for different skill levels and several ways to calibrate your controls.
Recommended Android Display Settings
Before changing sensitivity, make sure the game is running consistently. A highly responsive HUD cannot compensate for frequent frame drops or thermal throttling. In a fast shooter, inconsistent performance can make your aim feel different from one moment to the next.
| SETTING | RECOMMENDED VALUE | WHY IT MATTERS |
| Frame Rate | 60 FPS or highest stable option | Smoother movement and more consistent touch response |
| Visual Quality | Medium to High | Keeps the image clear without unnecessarily stressing the device |
| Field of View | 100 | Provides a wider view of the battlefield |
| Camera Shake | 0–30% | Reduces visual distraction during explosions and destruction |
| Brightness | Comfortable maximum | Makes enemies easier to distinguish in darker areas |
Prioritize Stable Performance
The highest graphics preset is not automatically the best competitive option. If your phone can maintain a stable frame rate at High, keep it there. If performance becomes inconsistent during large firefights, lowering visual quality is usually more useful than sacrificing responsiveness for extra graphical detail. Pay particular attention to long sessions. A device that starts at a smooth frame rate can become less consistent after several matches if heat buildup causes performance to drop.

Field of View
A 100 FOV setting is a useful starting point for players who want greater peripheral awareness. A wider field of view lets you see more of the arena at once, which can help when enemies move around the sides of your screen or when you are navigating a partially destroyed map. However, increasing FOV is not a free advantage. Objects appear smaller as the visible area expands, which can make distant targets more difficult to track on smaller phone displays.
Camera Shake
Explosions and map destruction can make heavy camera movement distracting. A setting between 0% and 30% is a sensible competitive starting range. Players who want the clearest possible sight picture can reduce it further. Higher camera shake may feel more immersive, but it can make tracking an opponent during a chaotic firefight unnecessarily difficult.

Camera Sensitivity Settings
Sensitivity determines how quickly your view responds when you swipe across the screen. There is no universally perfect number because sensitivity depends on your display size, touch response, grip, and muscle memory. The settings below should therefore be treated as a baseline for calibration.

| SETTING | STARTING VALUE | PURPOSE |
| General Camera Sensitivity | 50 | Balanced turning and target tracking |
| Scope Sensitivity | 30 | More controlled precision aiming |
| Camera Acceleration | 30 | Faster response during large swipes |
General Camera Sensitivity: 50
A value around 50 provides a useful middle ground between fast turns and controlled micro-adjustments. It is high enough to make quick direction changes possible without requiring several long swipes to turn around. Start here before changing anything else.
Scope Sensitivity: 30
Scoped weapons usually benefit from lower sensitivity than normal camera movement. A starting value around 30 makes small adjustments easier when lining up a distant target. This is especially useful for sniper-style weapons where a tiny overcorrection can move the crosshair completely off an enemy. If your scoped aim feels sluggish, raise the setting in small increments.
Camera Acceleration: 30
Acceleration determines how aggressively larger swipes translate into camera movement. A starting point around 30 gives you additional responsiveness for turning quickly while still allowing relatively controlled tracking. Players who rely heavily on flicks may prefer more acceleration, while precision-focused players often benefit from keeping it moderate.

Android HUD Layouts
Pixel Gun 2 allows you to reposition your controls, which gives you much more flexibility than simply changing sensitivity. Your HUD should let you perform the four most important actions without forcing your thumb to travel across the entire screen: move, look, fire, jump or crouch. Once you add aiming, weapon swapping, and gadget controls, a standard two-thumb layout can become restrictive.
Two-Thumb HUD for Beginners
The traditional two-thumb setup is the easiest place to start.
- Left Thumb: Movement joystick
- Right Thumb: Camera control, aiming, firing, jump, crouch, and gadget buttons
- Weapon Switching: Place the control close enough to the right thumb that it can be reached without leaving the camera area for too long.
Best For
This layout works well for casual players and newcomers who are still learning the game’s movement and weapon systems. It also works particularly well on smaller phone displays where adding several finger positions can make the screen feel crowded.

Three-Finger Claw HUD
A three-finger claw is a natural upgrade from the two-thumb layout.
- Left Thumb: Movement
- Left Index Finger: Fire
- Right Thumb: Camera movement, aiming, jump, crouch, reload, and weapon controls
Move the main Fire button toward the upper-left area where your index finger can reach it comfortably.
Best For
Use this layout when you want improved mechanical control without the learning curve of a full four-finger setup. It is particularly useful for players transitioning from casual matches into more competitive PvP.
Four-Finger Claw HUD
A four-finger layout gives every major combat function its own control area.
- Left Thumb: Movement joystick
- Left Index Finger: Fire
- Right Thumb: Camera and target tracking
- Right Index Finger: Jump, crouch, scope, and other important action buttons
Weapon switching and less frequently used controls can be positioned around the edges of the right side without interfering with your camera area.
Best For
Four-finger claw is best suited to players who already understand the game’s movement and want to maximize control in competitive PvP. It takes time to learn, so expect your performance to decrease temporarily when first making the switch.
HUD Button Size and Opacity
A competitive HUD should be easy to read without covering half the screen. Increase the size of the buttons you use constantly rather than enlarging everything. A range of 110%–130% is a useful starting point for fire, jump, scope/aim, and crouch. Smaller buttons can be reserved for controls that you rarely need during combat. Large action buttons reduce accidental misses, especially when your hands move quickly during a close-range fight.
Also, reduce the opacity of less important controls to keep the battlefield visible. Approximately 20%–30% transparency can make secondary buttons much less distracting while still keeping them visible. Keep critical combat controls noticeably clearer.

Build Your HUD Around Your Weapon
There is no reason for every loadout to use exactly the same screen arrangement. Different weapons place different demands on your hands.
- Sniper and Precision Builds: Give your scope and fire controls priority. Keep the scope button close to your aiming finger while leaving enough open screen space for precise camera movements. A lower Scope Sensitivity setting can also help with small corrections.
- Assault Rifle and SMG Builds: Prioritize camera movement, Fire, and weapon switching. These weapons frequently require continuous tracking, so you should be able to move your crosshair smoothly while maintaining pressure.
- Shotgun Builds: Place Fire, Jump, and movement controls where they can be reached rapidly. Close-range combat involves constant repositioning, making mobility more important than extremely precise long-range camera adjustments.
- Melee Builds: Prioritize movement, jump, camera control, and quick access to the relevant attack controls. Your HUD should let you stay mobile while keeping the opponent centered on-screen.

The biggest improvement to your Pixel Gun 2 controls does not come from discovering a magical sensitivity number. It comes from creating a setup that lets your fingers perform important actions without fighting each other. Once your layout feels comfortable, stop changing it every few matches. Consistency is what turns a technically good control setup into reliable muscle memory.
Read More
Looking for more game strategies and guides? Explore our full collection of tips & game guides to level up your gameplay!