


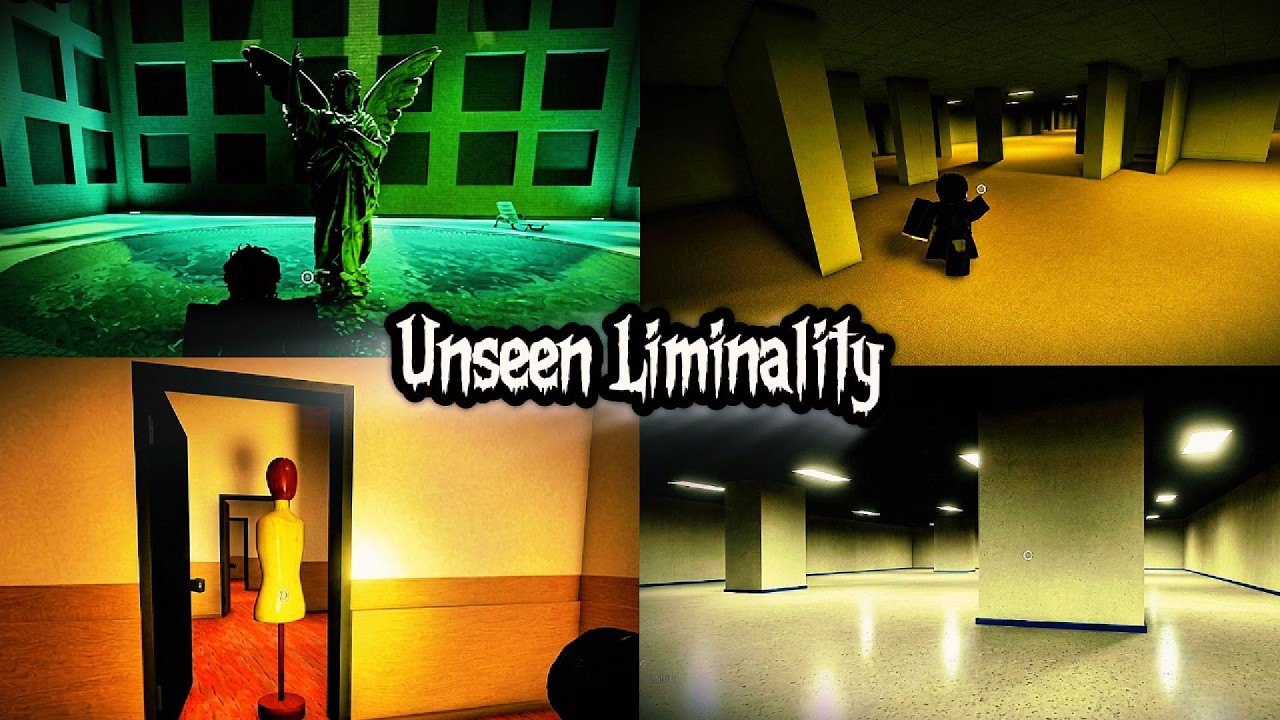
Unseen Liminality takes inspiration from Beyond Liminal and traditional Backrooms mythology, placing players inside unsettling environments where familiar spaces suddenly become unfamiliar. Endless corridors, hidden locations, secret routes, and hostile creatures make every level feel unpredictable.

One of the biggest challenges in the game is finding a way out. Some areas contain clear exit paths, while others are intentionally designed to mislead players or trap them in endless loops. Understanding how each level works can save you a great deal of time and significantly improve your chances of survival.

This guide covers every major level, sub-level, and notable area in Unseen Liminality, along with the most reliable methods for locating exits.
Main Levels & Walkthrough
Your goal throughout the game remains largely the same: explore unfamiliar environments, uncover hidden points of interest, collect useful items, avoid dangerous entities, and ultimately discover an escape route.

Level 1: The Lobby
The Lobby is the most recognizable area in Unseen Liminality and resembles the classic version of the Backrooms. Yellow wallpaper stretches endlessly in every direction, fluorescent lights buzz overhead, and identical hallways create a disorienting maze.
Major Threats: The Caroler, Headhunter Key
Points of Interest: Broken Wall, Fluorescent Transformer Room, Maintenance Vents
How to Find the Exit:
- Move away from your initial spawn location and listen carefully for environmental audio, especially running water and mechanical humming.
- Explore the lower sections of the walls until you discover a Maintenance Vent.
- Keep an eye out for suspicious wallpaper patterns. Darker sections may indicate hidden passages.
- Enter the ventilation shaft or move through the wall opening.
- The transition area will guide you toward either The End sub-level or The Poolrooms.
Because many corridors appear nearly identical, players often become trapped in circular routes. Marking intersections can make navigation much easier.

Level 2: The Poolrooms
The Poolrooms provide a dramatic visual change after leaving The Lobby. Instead of yellow walls and dry carpets, you’ll find blue ceramic tiles, shallow pools of water, large archways, and echoing chambers. Despite its calmer appearance, this level can be surprisingly dangerous.
Major Threats: Limited visibility, hostile entities near deep water sections
Points of Interest: Tile Slides, The Deep Pit, The Skylight Rotunda
How to Exit:
- Follow the shallow waterways while paying attention to the surrounding walls.
- Look for visible pipes and directional markers hidden among the tiles.
- Continue moving toward dry platforms.
- Search for a drainage tunnel illuminated by red emergency lights.
- Enter the tunnel to trigger the next level transition.
Moving too quickly through this area can cause you to miss important environmental clues, so take your time while exploring.

Sub-Levels & Secret Zones
Sub-Level 1: The End
Despite its name, this mysterious location isn’t the “end” of the game. Instead, it’s a deceptive area designed to confuse players. The environment resembles an endless library or archive illuminated by neon lighting. Rows of bookshelves extend into the distance, creating the illusion that there’s always another room waiting ahead.

Connected Level: The Lobby
Exit Strategy:
- Avoid wandering through the central area for too long.
- Examine bookshelves carefully.
- Search for interactive books or hidden panels.
- Once you discover the concealed passage, a ladder will lead you toward the exit portal.
Being patient is very important here. Rushing through the library causes players to overlook the interactive objects that reveal the escape route.
Sub-Level 2: Cap’n Clark’s Unseen Empire
This unusual location stands out because of its weird design. Arcade cabinets, mascot decorations, storage rooms, and surreal environmental details give the area a completely different atmosphere.
Connected Level: The Lobby
Exit Strategy:
- Pass through the mascot performance area.
- Continue toward the maintenance corridor located behind the stage.
- Interact with the glowing doorknob at the end of the hallway.
- You’ll be transported back to the main hub area.
Legacy & Trap Zones (Beware Dead Ends)
Not every area in Unseen Liminality provides a straightforward way out. Some legacy locations function primarily as exploration zones, while others are essentially elaborate dead ends.
| ZONE/LEVEL | EXIT AVAILABLE? | DESCRIPTION |
| Liminal Hotel | No Standard Exit | One of the most confusing locations in the game. Traditional exits don’t exist here, and many players simply return by rejoining the server. |
| Dead Mall | Yes (Limited / Event) | An abandoned shopping center that occasionally appears during special events. There are hidden elevator shafts leading to additional rooms and the exit. |
| Desolate Office | Yes (Vent) | Offers a more conventional design. You can locate an escape route by searching the ceiling ventilation system and entering the duct network. |

Essential Survival Tips
- Pay Attention to Sound: Many entities announce their presence before they appear. Distorted radio broadcasts, unusual footsteps, and sudden audio cues can warn you that danger is approaching. Using headphones can improve your awareness.
- Don’t Waste Your Stamina: Running continuously might seem like a good idea, but it usually creates more problems than it solves. Reserve your stamina for emergencies. If an entity begins chasing you while your stamina meter is empty, escaping becomes extremely difficult.
- Use Markings: Dropping items, identifying unique environmental details, and remembering landmarks can prevent you from returning to the same path repeatedly.
Navigating the surreal environments of Unseen Liminality requires a balance of environmental awareness, patience, and careful movement. Because the game relies heavily on visual deception and subtle spatial clues, learning how to identify real exit routes while conserving your stamina will drastically increase your survival rate across every run. Keep an ear out for distinct spatial audio, take full advantage of safe spots to recover, and avoid rushing into unfamiliar zones unprepared.